

-
![]()
3D printed walls are virtually identical to CMU construction.
The results are still comparable to standard CMU (Concrete Masonry Unit) walls. Reinforcement, roofing, and all other tasks are then completed in the same way as typical housing projects.
-
![]()
Reinforced
Since our 3D printed structures are directly comparable to the well-documented and accepted reinforced concrete masonry unit (CMU) wall we reinforce them the same way.
-
![]()
Strong material
The building layout is designed to simplify the necessary structural calculations such that the design complies with local building codes. Our 3D material reaches 3,627 Psi after 28 days of curing, exceeding construction code standards.
-
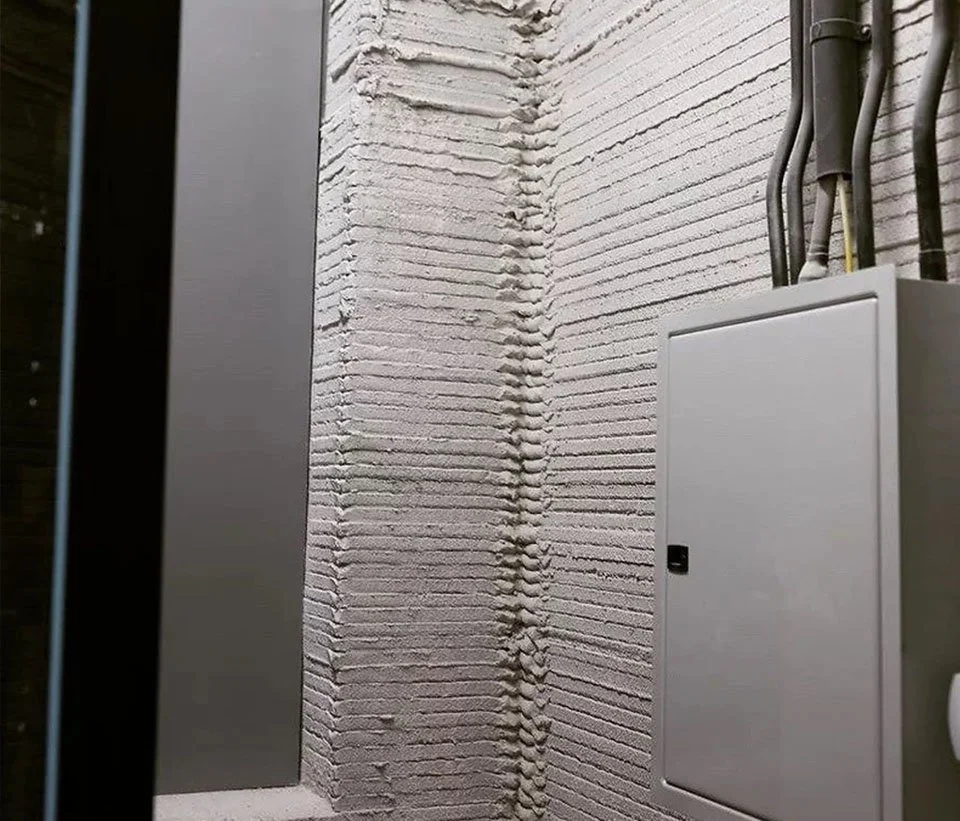
![]()
Mechanical, Electrical, Plumbing (MEP)
After the walls are printed the mechanical, electrical, and plumbing components are installed in the same manner as a CMU-built house. However, emerging technology is consistently introducing more efficient installation methods.
-
![]()
Cutting and Drilling
The walls are cut and drilled as you would with traditional CMU or concrete walls. 3D printing technology simply changes the way the walls are built — from manually to robotically. The remaining processes are not significantly affected.
-
![]()
Non-Stop Printing
3D print material design is a complex science that differs significantly from regular concrete. 3D print material can be created in a variety of ways with different properties and features. At Apis Cor, our material benefits from a fast flow and setting time, so the structures can be printed without the need to stop and wait for the layers to harden before continuing on.
-
![]()
Insulation
The same insulation is used for 3D printed walls as regular CMU walls. Following local requirements, different insulation materials are installed on the wall to meet the building developer's desired R-value.
-
![]()
Finishing
Apply any type of finishing materials to achieve the results you want for your design. 3D-printed walls can be covered with stucco or simply painted over. The walls we print are impressively smooth, without the unsightly "sausage effect" — meaning they require less material and effort to finish the wall surface.


Cost-Effective Housing Solutions
3D construction printing significantly reduces building costs by up to 70% compared to traditional methods. By minimizing material waste, labor requirements, and construction time, this technology makes affordable housing a reality, addressing the housing deficit in a financially sustainable way.
Speed and Efficiency
With the ability to construct homes in a fraction of the time—sometimes in less than a week—3D printing technology accelerates project timelines without compromising on quality. This speed is critical for meeting urgent housing and infrastructure demands in rapidly growing communities.
FAQs
-
The cost of 3D printing a house depends on several factors, including the size and complexity of the design, materials used, labor costs, and location. Below is a general breakdown to help estimate the cost:
1. Base Cost of Construction
Small Home (350–600 sq ft): $5,000–$15,000
Ideal for affordable housing or temporary structures.
Medium-Sized Home (600–1,200 sq ft): $15,000–$40,000
Suitable for single-family homes with standard designs.
Large Home (1,200+ sq ft): $40,000+
Includes more complex designs or multi-room layouts.
2. Key Cost Components
Materials:
Concrete mix (such as Sika’s 3D printing mix): ~$1,000–$5,000 per house depending on size.
Other materials (e.g., reinforcement for structural integrity): varies.
Equipment and Machinery:
Using your existing equipment, like the 3D Potter Scara Roadrunner, reduces upfront costs.
Labor:
While 3D printing reduces labor needs significantly, skilled operators and technicians for the printer, mixers, and pumps are required.
Site Preparation:
Land leveling, foundation setup, and utility connections may add $5,000–$15,000 depending on the location.
Finishing Work:
Includes windows, doors, roofing, electrical, and plumbing, which typically account for 30%–50% of the total cost.
Total Estimated Cost
For a single-family home in Nigeria, using a 3D printer like the Scara Roadrunner, the cost can range from $10,000–$25,000, depending on size and finishes. This is significantly lower than traditional building costs, which can range from $30,000–$50,000 for similar homes.
Would you like a more detailed cost breakdown for a specific house size or location?
-
The time it takes to 3D print a house depends on several factors, including the size and complexity of the design, the type of 3D printer used, and environmental conditions. Here's an estimate based on typical scenarios:
1. General Timeframes
Small Home (350–600 sq ft): 12–24 hours
These are basic designs, often used for affordable housing or small structures.
Medium-Sized Home (600–1,200 sq ft): 24–48 hours
Suitable for standard single-family homes with basic interior and exterior features.
Large Home (1,200+ sq ft): 3–5 days
Includes multi-room layouts and more complex architectural designs.
2. Key Factors Affecting Print Time
Printer Type and Speed:
Advanced 3D printers, such as your Scara Roadrunner, can work faster due to high precision and efficiency.Complexity of Design:
Intricate architectural features or curved designs require more time than simple, box-like structures.Material Properties:
The drying or curing time of the concrete mix can influence the pace. Sika’s 3D printing mix is optimized for faster curing, which helps reduce overall time.Weather Conditions:
In areas with high humidity or extreme temperatures, curing times may be slightly longer.Finishing Work:
While the structural shell can be printed in a day or two, additional time is needed for finishing tasks like roofing, plumbing, wiring, and installing windows and doors.
3. Comparative Efficiency
Traditional construction can take weeks to months for similar-sized homes, while 3D printing reduces this to days, making it ideal for projects requiring speed, such as disaster relief housing or large-scale affordable housing developments.
-
In most cases, the roof, windows, and other finishes are not 3D printed and are installed separately after the main structure is completed. Here's how it typically works:
1. 3D-Printed Components
Walls and Structure:
The 3D printer primarily focuses on constructing the shell of the house, including walls, partitions, and sometimes foundational elements.Structural Features:
Some 3D printers can incorporate conduits for wiring and plumbing directly into the printed walls.
2. Components That Are Not 3D Printed
Roof:
Traditional roofing materials (tiles, metal sheets, or concrete slabs) are usually added after the walls are complete.In some cases, prefabricated or modular roofs can be used to complement the 3D-printed structure.
Windows and Doors:
These are sourced and installed using conventional methods. Openings for windows and doors are typically included in the 3D-printed walls.Flooring:
While the floor slab may be 3D printed, finishing materials like tiles, wood, or laminate are installed separately.Interior Finishes:
Features such as cabinets, fixtures, paint, and decorative elements are added after the printing process.
3. Potential for Fully 3D-Printed Homes
Advancements in 3D printing technology are gradually making it possible to print additional components:
Roofs: Some experimental projects have used 3D printing to create lightweight, curved roofs.
Decorative Elements: Cornices and ornamental features can be directly printed into walls.
However, for now, combining 3D printing with traditional construction methods offers the best balance of efficiency, cost, and practicality.
Like other specialty tools, 3D printers help us accomplish difficult tasks faster and easier. With their assistance, we’ve already taken a huge leap in changing the way we build houses.
-
Advantages of 3D Printing in Construction
Cost Efficiency
Lower Labor Costs: Automation reduces the need for large construction crews.
Minimized Waste: Precise material use eliminates excess, saving costs on resources.
Affordable Housing: Makes constructing low-cost homes more feasible, especially for underprivileged communities.
Speed and Productivity
Faster Construction: Entire homes can be built in days instead of weeks or months.
Efficient Workflow: Continuous printing processes reduce downtime.
Design Flexibility
Complex Geometries: Allows for intricate designs that are difficult or impossible with traditional methods.
Customization: Homes can be tailored to individual preferences or specific site requirements.
Sustainability
Reduced Material Waste: Uses only the materials required for construction, lowering environmental impact.
Eco-Friendly Materials: Enables the use of recyclable or sustainable materials, promoting green building practices.
Enhanced Structural Integrity
Precision: High accuracy ensures consistent quality and reduced errors during construction.
Durability: Optimized concrete mixes and innovative designs contribute to stronger structures.
Accessibility
Affordable Solutions: Reduces the cost barrier for housing in underserved areas.
Remote Application: Can be deployed in remote or disaster-stricken regions where traditional construction is challenging.
Reduced Human Error
Automated processes reduce the chances of mistakes, leading to fewer defects and rework.
Scalability
Mass Production: Ideal for building multiple units in housing projects efficiently.
Adaptability: Scales from small-scale structures to large commercial projects.
Safety Improvements
Safer Work Environment: Automation limits the need for manual labor in potentially hazardous environments.
Disaster Relief: Rapid construction can aid in rebuilding after natural disasters.
Modern Aesthetic Appeal
3D printing allows for innovative architectural designs that can enhance the visual appeal of buildings, making them unique and futuristic.
Owing to a critical shortage of skilled labor worldwide, 3D printing technology helps to narrow the housing deficit without taking humans jobs. As traditional methods can no longer keep up with demand, we’re putting smart robots to work for the benefit of affordable housing.
-
Installing insulation and electrical systems in a 3D-printed house involves combining traditional construction techniques with the unique features of 3D-printed walls. Here's a step-by-step guide:
1. Insulation Installation
The method of insulating a 3D-printed house depends on the wall design and whether insulation is incorporated during printing.
A. Insulation Options
Hollow Wall Design:
If the 3D-printed walls have hollow cores, insulation materials (e.g., spray foam, rigid foam boards, or fiberglass) can be inserted into the cavities.External Insulation:
Attach rigid insulation boards (e.g., EPS or XPS foam) to the exterior walls.
Use cladding or stucco to cover and protect the insulation.
Internal Insulation:
Apply spray foam or use insulated panels on the interior surfaces of the walls.
Drywall can be installed over the insulation for a clean finish.
B. Installation Steps
Inspect the Wall Design: Determine if the 3D-printed walls are solid or hollow and plan the insulation method accordingly.
Prepare the Surface: Clean and smooth the wall surface if attaching external or internal insulation.
Install Insulation:
For hollow walls: Inject spray foam or insert pre-cut rigid foam panels.
For external/internal methods: Secure insulation boards with adhesives or mechanical fasteners.
Seal Gaps: Use caulking or spray foam to seal any gaps for maximum energy efficiency.
2. Electrical System Installation
Electrical wiring can be incorporated into the design during or after printing.
A. Conduit Integration During Printing
During the printing process, conduits (PVC pipes) for wiring can be embedded into the walls by pausing the printer at designated points. This allows for seamless integration.
B. Post-Printing Electrical Installation
Design Wiring Layout: Plan the locations of outlets, switches, and light fixtures based on the house design.
Cut Channels for Wiring:
Use a wall chaser or similar tool to create grooves in the 3D-printed walls for wiring conduits.
Ensure the grooves are deep enough to accommodate the conduit and wiring.
Install Conduits and Boxes:
Insert electrical conduits into the grooves.
Fix outlet and switch boxes at the planned locations.
Pull Wires: Run electrical wires through the conduits using a fish tape.
Connect and Test: Connect wires to outlets, switches, and the breaker panel. Test the system for functionality and compliance with local electrical codes.
3. Final Steps for Both Systems
Inspection: Ensure all work complies with local building and safety codes.
Cover and Finish:
For insulation, cover with drywall or other finishing materials.
For electrical, seal channels with plaster or other suitable materials.
-
There is virtually no limit to the available print size. Using his continuous track mobile platform, the printer can reposition itself and continue printing from a new position until it runs out of land to print on.
-
The printer is capable of printing a building with a height of 3.2 meters. However, thanks to its compact dimensions, it can be positioned on a riser to extend the print height. Currently, we limit our build height to 2 floors in order to comply with CMU codes. Just as in CMU construction, the entire house height is first printed and then the wood joists are installed.